Several years ago, I was able to tweak Blender to behave somewhat like Unity. However I soon after lost that computer as well as the configuration. I kept meaning to configure it again, but I never remembered what I had done.
Today, I finally installed the latest Blender (2.78c) and decided to get it configured correctly again. Here is what I did.
1) Open the User Preferences
In the Info window (the default menu bar on the top), select File → User Preferences

In the User Preferences window click the Input tab

2) Make the Left Mouse Button the selection button
Blender is very strange in that it defaults to use the right mouse button for selection. Let's change that to the standard left mouse button. In the left column, set the left mouse button.

3) Ensure View Navigation is set to Walk
Blender allows for two navigation modes: Walk and Fly. Fly might sound like what we want, but it behaves more like a spaceship where the rotational speed is based on the position of the mouse onscreen and you use the mouse wheel to control "throttle". Walk is actually what we want, since it behaves like standard FPS controls. This is the default setting in Blender, but we should ensure it is set.

You should also ensure that the Gravity checkbox is unchecked (the default) to prevent falling due to gravity.
4) Create a new input configuration called Unity
We don't want to muck with any of the existing input binding configurations, so let's create our own. Click the + button next to the Blender/Max/Maya settings.

Give it the name "Unity" (or whatever you want) and click OK.

Ensure that is now your selected input configuration.
5) Disable the setting of the 3D cursor
Normally the left mouse button sets a "3D cursor" in Blender. I'm sure it's useful to many people but I find it confusing and gets in the way. Since we switched left mouse to be selection, Blender switches the right mouse button to set the 3D cursor. We don't want this, so we disable it in the input bindings.
3D View → 3D View (Global) → Set 3D Cursor

6) Create new input binding for Right Mouse Button to enter View Navigation mode
This took a bit of sleuthing, and is one of the most important parts. Blender lets you enter View Navigation mode by hitting Shift+F. Searching through the input bindings I found the Python command Blender binds to that key combo.
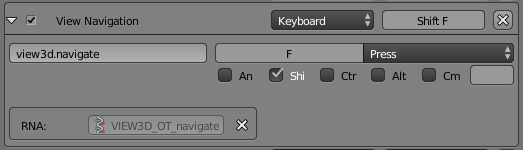
We now want to replicate that functionality for the right mouse button. In the 3D View → 3D View (Global) section, add a new input binding by clicking the + Add New button

Now, change the input to be when the right mouse button is pressed. Enter the view3d.navigate Python command to the binding. Like so:

7) Disable the Right Mouse Button from cancelling View Navigation mode
By default the View Navigation mode is cancelled by any right mouse button action. We want Blender to leave View Navigation mode when we release the right mouse button, but we want it to retain our final position and orientation. In Blender the is Confirm action, versus the Cancel action, which resets to view to whatever it was before View Navigation mode was entered.
In the 3D View → View3D Walk Modal section, disable the right mouse cancelling binding.
8) Add new Right Mouse Button confirmation
Now to make Blender save the position when releasing the mouse butotn, we have to bind it to the Confirm action. In the 3D View → View3D Walk Modal section, add a new input binding by clicking the + Add New button
Then, set the right mouse release to be confirm, like so:

That's it! You should now be able to use the right mouse button to fly around a Blender scene just like in the Unity editor!