Last night I decided to increase the scale of the planet to Earth's size. The original size of the radius was 60,000 meters. Earth's radius is about 6.5 million meters. So, I had to make my planet over 100 times larger.
Unfortunately, all sorts of problems arose from attempting to do this. First, my depth buffer went to crap. If I wanted to be able to see anything from even a low altitude, I had to extend the far clipping plane back to at least 1 million meters. This resulted in all sorts of errors with triangles that were fighting over their depths because the range was trying to be stretched over such a long distance.
The second problem that occurred was that my camera was rotating in "steps". If I moved the mouse up, instead of smoothly rotating the view upwards, it would snap every Pi/4 or so. This snapping problem was alleviated by shrinking the size of the planet. Shrunk in half it was still too bad to use, shrunk by 4x was much better, but the problem was completely gone if I shrunk by 10x.
I really need to fix all of these problems so that I can have Earth-sized planets. There are many other planets that are even larger than Earth so this is very important. I have found some articles online where people have found solutions to these problems. I'm just unsure of how feasible these solutions are for XNA (they are all OpenGL solutions).
On a side note, I switched my Perlin noise function from fBm to ridged multifractal and it looks much better. I am very impressed with the terrain results. I would post screenshots, but with the depth issues and such, I figured I would wait.
Thursday, July 31, 2008
Wednesday, July 30, 2008
Go Simple, Go Fast
I've made the executive decision to just go with the simple spherical lighting. It's already working and it's 3 times faster than the surface normal generation method. Besides, it will be simple to calculate the surface normal in a geometry shader later. Unfortunately XNA doesn't support geometry shaders currently. However if it ever adds that functionality in the future, I'll be able to add very realistic lighting rather quickly.
I'm now going to move onto something else. What that is exactly, I'm still not sure of. I have a list of TODOs, but I need to determine which one is a higher priority right now.
I'm now going to move onto something else. What that is exactly, I'm still not sure of. I have a list of TODOs, but I need to determine which one is a higher priority right now.
Tuesday, July 29, 2008
Do You See the Light?
I promised myself that I wouldn't post another update until I had lighting on my planetary terrain. I have partially fulfilled that promise.
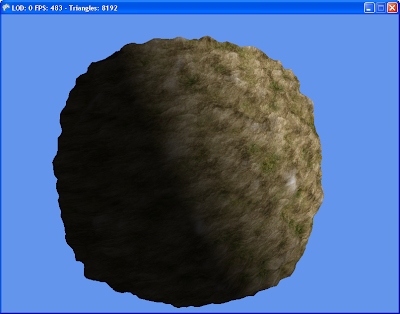
While I did successfully get lighting on the terrain, it is not as realistic as I want it. I currently have two solutions. The first is that I'm simply illuminating the planet as a sphere. While this looks great in places where the light is coming straight down, it looks bad on the edges where there should be long shadows. (Ignore the square-ish terrain.)
The second solution I have actually tries to calculate the surface normal in the vertex shader. I estimate where the neighboring vertices are to the right and above the current vertex. I calculate the two edge vectors and then take the cross product of them to acquire the normal of the surface. While this all sounds good and makes sense in theory, it isn't yielding the correct results. I have random shadow and light "splotches" scattering over the planet, except for one quarter-sphere (is that what a half of a hemisphere is called?) that tu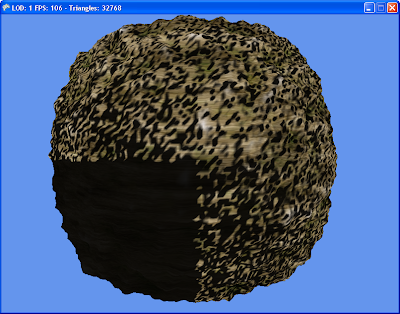 rns out all black.
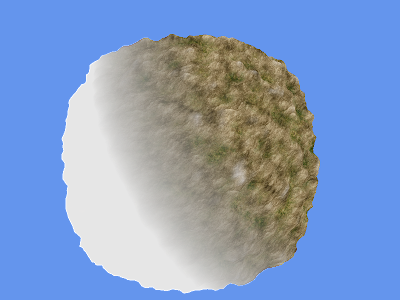
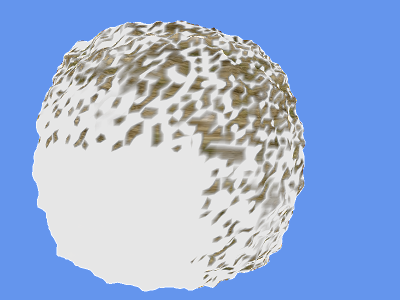
On a sidenote that's rather strange, if I use the XNA screenshot component that I wrote, the shadows all come out as white. If I use Alt-Print Screen and capture the whole window, it comes out as black (which is what is actually displayed). Check out the white versions:
[Edit: Ha ha! I didn't realize until I posted the screenshots that they aren't coming out as white, they are coming out as transparent, which makes much more sense!)
While I did successfully get lighting on the terrain, it is not as realistic as I want it. I currently have two solutions. The first is that I'm simply illuminating the planet as a sphere. While this looks great in places where the light is coming straight down, it looks bad on the edges where there should be long shadows. (Ignore the square-ish terrain.)

The second solution I have actually tries to calculate the surface normal in the vertex shader. I estimate where the neighboring vertices are to the right and above the current vertex. I calculate the two edge vectors and then take the cross product of them to acquire the normal of the surface. While this all sounds good and makes sense in theory, it isn't yielding the correct results. I have random shadow and light "splotches" scattering over the planet, except for one quarter-sphere (is that what a half of a hemisphere is called?) that tu
 rns out all black.
On a sidenote that's rather strange, if I use the XNA screenshot component that I wrote, the shadows all come out as white. If I use Alt-Print Screen and capture the whole window, it comes out as black (which is what is actually displayed). Check out the white versions:
[Edit: Ha ha! I didn't realize until I posted the screenshots that they aren't coming out as white, they are coming out as transparent, which makes much more sense!)


Wednesday, July 23, 2008
Rotation Solved!
Well I implemented my pseudocode in XNA last night, made just some minor changes, and then I had a working rotating mesh. The guidance I received from Steve Hazen on the official XNA forums really helped me out and pointed me in the right direction.
I would post the code here, but I don't know how to post it without it looking atrocious.
I have the code posted in the XNA forums:
http://forums.xna.com/forums/p/14547/76204.aspx
As you can see from the final postings, Steve recommends some tweaks to the code that would increase accuracy and make it more efficient.
I'm really happy to finally have this problem solved. It took me four days to finally get a working solution. Now I can move on to the next item to implement. It's going to be tough as well, but no where near as tough as the rotation. At least that's what I'm hoping.
Until next time...
Tuesday, July 22, 2008
Rotation Solution?
I think I may have a solution to the rotation problems I was having. I have pseudocode scrawled out on some paper I found. (Along with several drawings of 3D axes with angles, cones, and cameras in various positions.)
My goal tonight is to implement the pseudocode in XNA and experiment with it. I'll report my findings tomorrow.
Until next time...
My goal tonight is to implement the pseudocode in XNA and experiment with it. I'll report my findings tomorrow.
Until next time...
Monday, July 21, 2008
Rotation Issues
I have been working hard on coming up with a new LOD algorithm that eliminates that pesky "water" effect. I think I have a pretty good idea for a system that would not only remove that problem, but would also make the vertex shader faster.
Unfortunately I am currently stuck facing some problems with rotations. I have a mesh that I want to rotate around a sphere so that is always points at the camera. I could create a billboard matrix and use that, but there is a problem. That would create the water effect again. What I need to do is move the mesh in steps. If the camera moves beyond an angle threshold for either left/right or up/down, then the mesh should be moved one step in the appropriate direction.
I decided to use spherical coordinates to calculate the horizontal and vertical angles of the camera. This works great until you reach the north or south poles. Once you cross the poles, the mesh is rotated 180 degrees.
Here is the reason why that happens:
The "vertical" angle, theta, ranges from 0 to pi. Where 0 is pointing down the -Y axis and pi is pointing up the +Y axis. The "horizontal" angle, phi, ranges from 0 to 2pi. Where 0 is pointing along the +X axis, pi/2 is pointing along the +Z axis, pi is pointing along the -X axis, and 3pi/2 is pointing along the -Z axis.
In the case when the camera passes over the north (+Y) pole, theta is at its peak (pi) but then starts decreasing as you continue to the other side. Whereas phi essentially gets +pi added to it (or -pi depending up where the pole is crossed). That is why the object is being rotated 180 degrees (pi radians).
Whew!
The problem is that I don't know how to fix this rotation. I have been tinkering around with it for the last several days to no avail. I certainly hope I come up with a solution soon. I really want to continue work on my new LOD algorithm.
Until next time...
Sunday, July 20, 2008
LOD Algorithm
I thought I would explain the algorithm I used for the planetary LOD in more detail.
When you first start the program, two meshes are generated: a cone and a ring. Both of these meshes are configurable at creation. For a cone, you can define how many "slices" it is broken into (imagine a pie and cutting into equal slices). For a ring, you can define how many slices as well as how many inner rings the ring has. For example, you can have a ring mesh that is made up of five inner rings and split into forty-five slices. Both of these meshes are scaled to a unit sphere (its actual just a hemisphere) which is centered at the the origin and "points" out along the -Z axis.
At the lowest level of detail, the planet is just a cone. If the level is increased, the cone is shrunk in half and a ring is drawn attached to the bottom of the cone. If the level is increased again, the cone is shrunk in half again, the existing ring is shrunk in half, and another new ring is attached to the bottom of the existing ring. This process continues until the highest level of detail is reached.
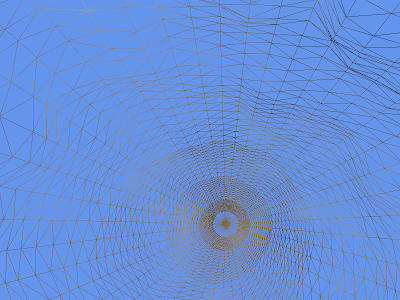
The resizing of the meshes is all done in the vertex shader. The terrain height is also calculated in the vertex shader via 8 octaves of fBm Perlin noise. This means that after the mesh generation in the beginning, the CPU does practically nothing. It just keeps track of what the current level is, and updates the shader parameter as necessary.
The hemisphere is updated every frame to be centered at the camera by simply calculating a billboard matrix as the world matrix of the hemisphere.
Well that should give you a decent grasp of how my LOD algorithm functions. As I mentioned in my previous post, it's not perfect because the centering of the hemisphere every frame really has a nasty looking "water" effect. I'm already at work on fixes for that, so if I get that working, I'll post what I did.
I'll leave you with a quick video of my LOD algorithm at work.
Saturday, July 19, 2008
Planetary LOD
I have been spending the last week writing my own implementation of an LOD system for a planet. It is inspired by Spherical Clipmaps, but it is not an actual implementation of them.
As I said, I began writing it last week (exactly a week ago today) and I finally have it all up and running (using real-time 3D Perlin Noise in the Vertex Shader and texture blending, no less!). Unfortunately, I have it running too smoothly, if you can believe that. I have the vertices being updated and centered under the camera every frame. This leads to the terrain looking similar to flowing water as you fly around the planet. As long as the camera is stationary, everything looks great. You can spin the camera around and look at all of the terrain around you. As soon as you start moving though, the "water" effect is very apparent.
I first tried to fix it by having the terrain position updated only once a second, but that looked terrible. So, I ended up saving the old camera position and then calculating the angle between the current camera position and the old position each frame. If the angle becomes greater than a threshold (I used something like Pi/64, yes that's sixty-four!) then I update the terrain position. This looks alot better than the time-based updating and it removes the "water" effect. Unfortunately, it also makes the terrain very "poppy". For example, if you see a mountain in the distance and you start to fly toward it, you would suddenly see more detail "pop" in as you got closer.
I think what I have now is pretty decent, but I want to have very smooth terrain, with no popping and no water effect. So, I'm kind of back to the drawing board trying to think of a system that fixes both of those problems. Not everything I have now is throw-away code though. I think I should be able to carry over alot from this project to the updated LOD system.
Friday, July 18, 2008
First Blog Entry
Greetings! Here is my first blog post .... um ever!
I will attempt to use this space to talk about some of the graphics projects that I am working on. Hopefully I actually stay devoted to it. I always seem to slack off on things similar to this.
It's your duty as a reader to reprimand me if I fall behind on updates!
Until next time...
I will attempt to use this space to talk about some of the graphics projects that I am working on. Hopefully I actually stay devoted to it. I always seem to slack off on things similar to this.
It's your duty as a reader to reprimand me if I fall behind on updates!
Until next time...
Subscribe to:
Posts (Atom)